Posts having to do with water saving, conservation

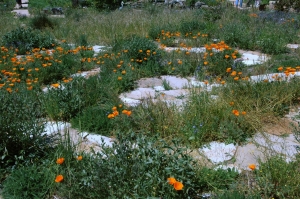
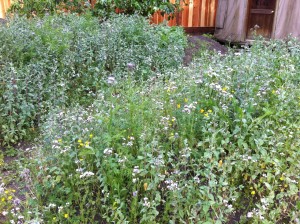
The wildflowers planted in the meadow and now in a riot of bloom, and it seems like only half of the types have bloomed so far, so we have more colors to go.  The grasses are slowly growing in in between.  I understand from the sources I have read on Native California Grasses, that I should expect this first year to be mostly establishing root structure with a little bit of grass above the ground, and that next spring is when I can expect to see more growth.  In the mean time, however, the flowers are giving us plenty of green.

Wildflower mounds in the back

The various edible cultivars of plants that we have in the yard are being grown in “guilds” of plants with an eye towards permaculture.  Guilds are groups of plants that have been found to work very well together because they each provide something that the other plants around them need, whether it be acidification of soil, shade, nitrogen fixing or simply support for the other to grow on.  If carefully selected and sited, guilds overall require less water, harbor fewer pests, suppress weeds, and are more more productive without needing chemical fertilizers.  Our (grey water irrigated) fruit trees are interplanted with blueberry bushes.  This year we are sheet mulching around the trees and bushes to bring the new trees through the hot summer with a minimum water requirement while they establish their roots.  Sheet mulching consists of a layer of corrugated cardboard over the ground covered with compost and mulch to a foot deep and left to rot for a year, and it is excellent for suppressing weeds which otherwise would be a constant battle.  Next spring after the sheet mulching has had a year to decompose, we will interplant legumes of various sorts all through the orchard.  (You will also see that we have finally replaced our fence all the way around, getting rid of the rotting, leaning, broken eyesore that we had before and replacing it with a fence with a custom top lattice that echos the horizontal bar design theme within the house.)

The fruit tree orchard with blueberry bush interplantings, sheet mulch and the new fence visible along the right side
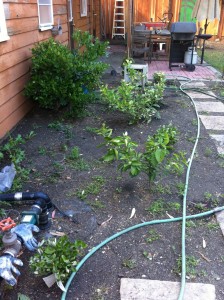
The citrus trees (two limes, one lemon) with feijoas, blackberry and raspberry. at the end of the path, the kiwi vines to be grown on the trellis can be seen.

Our citrus trees have pineapple guava (aka feijoa), blackberries and raspberries interplanted around them.  We haven’t yet sheet mulched that area, so in the picture you can see that the weeds are already aggressive in that area.

As part of getting the fence replaced, we needed to move all of the piles and piles of stones that we had been hoarding all over the yard for the eventual construction of two ponds and a stream in the front and middle yards.  We decided to assemble them into a dry creek bed of sorts running through the area where we will eventually have the stream so that we could plant all of the appropriate plants around that area before we built the stream (in one or two, or three years).  It ended up looking surprisingly nice, and it is extremely useful for planning where plants are going to go.  We’ve put in some douglas iris and various Juncus varieties that are difficult to grow from seed (I’ve been trying, and haven’t been too successful), and all around the stream bed on the greywater wetlands we’ve planted bull clover, so hopefully we’ll be seeing some of that coming up soon.

The dry creek running through the grey water wetlands

Other edible plants in the yard include an old fig tree that produces luscious pale green figs with bright red interiors, a couple of passiflora edulis varieties, huckleberries and currants and wild strawberries as part of the redwood understory in the front yard, and, of course, a kitchen garden of various different herbs including lots of mint for mojitos

Our mint and sage doing well in the little kitchen plot by the patio

Now that the house is in pretty good shape, it is time to start covering all of the bare earth around the house with plants.  When we worked earlier with our landscape architect, Amy Cupples-Rubiano, she had put together a beautiful design with native plants and different climate zones in the yard.  For the open, sunny, unirrigated areas the plan was for “open grasslands” – native grass and wildflower meadows that would go green in the winter rains, burst into color in the spring and then become a dormant golden brown during the summer.  For the planters nearer the house on the sunny south side that tends to get very hot from both direct sun and reflection off a sunny wall, the plan was for chaparral species like manzanita.   The shaded  areas around the fruit trees would be filled with more shaded grassland species, the front yard would have redwood understory plants in around our huge Deodara tree in the front yard (and our new tiny redwood seedlings that we hope will grow up to join our neighbor’s redwood grove).  The final “climate zones” are the greywater wetlands with rushes and bog plants that will live with their roots down in the greywater gravel leach field, and then the orchard which is watered from the output from the greywater wetlands.

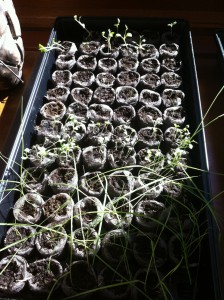
It will be a multi year process getting all of these plants established, but I have started with a combination of broadcasting seeds in the meadows (seeds available from Larner Seeds, a specialty native plant seed company), starting the seeds that need more care in little greenhouse trays, and buying container plants from our local Summerwinds nursery that has a California Natives section, and, of course, the famous Yerba Buena nursery where huge numbers of native plants are available, and ordering bare root fruit trees.  Where possible, I tried seeds, as container plants run $5-$15 per container, and I have a LOT of bare earth to cover.

Seedlings in the “jiffy” planter

There will be updates as I go along, but the following plant species are the ones going into the various parts of the garden:

Open Grassland Grasses (all from seeds, sowed directly) :

  1. California Fescue (festuca californica)
  2. Blue Fescue (festuca idahoerisis)
  3. Purple needlegrass (nasselta pulchra)

Open Grassland Wildflowers (all from seeds, sowed directly):

  1. California poppy (Eschscholzia californica)
  2. Blue Thimble flowers (Gilia capitata)
  3. Tidytips (layica platyglossa)
  4. Sky Lupine (lupinus nanus)
  5. plus “hills of california” wildflower mix from Larner seeds

Shaded Grasslands (all from seeds, grown as seedlings)

  1. California Fescue (Festuca californica)
  2. Douglas Iris (Iris douglasiana)
  3. Pt. Reyes Checkerbloom (sidalcea calycosa rizomata)
  4. Blue-eyed grass (sisyrinchium bellum)
  5. Yellow-eyed grass (Sisyrinchium californicum)

Chapparal garden (all container plants except as noted)

  1. Marina Madrone Tree (arbutus ‘marina’)
  2. Western Redbud Tree (Cercis occidentalis)
  3. Manzanita densiflora (Arctostaphylos densiflora “sentinel”)
  4. Wood’s Manzanita ground cover (arctostaphylos uva-ursi ‘wood’s compact’)
  5. Western Mock-Orange (Philadelphus Lewisii)
  6. Coffeeberry (rhamnus californica ‘Eve Case’)
  7. Collingwood rosemary (rosmarinus officinalis)
  8. Dark Star wild lilac (ceanothus ‘dark star’)
  9. Blue blossom wild lilac (ceanothus thyrsiflorus) (attempting to grow from seeds, not successful yet)
  10. White sage (salvia apiana) (from seeds, grown as seedlings)

Manzanitas waiting for their planter to be made

Redwood understory (all container plants except as noted)

  1. Western columbine (aquilegia formosa) (seeds, grown as seedlings)
  2. Western sword fern (polystichum munitum)
  3. coral bells (heuchera)
  4. Redwood sorrel (oxalis oregana)
  5. Wild Ginger (asarum caudatum)
  6. Coastal strawberry (fragaria chiloensis)
  7. Shaggy Alum root (heuchera pilosisima) (seeds, broadcast… we’ll see)
  8. Evergreen Huckleberry (vaccinium ovatum)

Planting “redwood understory” with redwood bark around it

Wetlands (some container, some seed, but I had a lot of difficulty finding suitable plants!)

  1. Common horsetail (equisetum arvense)
  2. California rush (juncus patens)
  3. Slender sedge (carex praegracilis) (seed, grown as seedlings with some sown directly)
  4. Bull clover (trifolium fucatum) (seed, to be sown directly)

Orchard and fruit shrubs/vines (greywater irrigated)

  1. Pomegranate
  2. 3-in-1 cherry tree (has bing, ranier and one other type grafted in)
  3. 4-in-1 pluot tree (flavor king, flavor supreme, dapple dandy and ?)
  4. Snow queen Nectarine
  5. Blenheim apricot
  6. Pinkerton avocado
  7. Kiwi vines
  8. Varigated Eureka lemon
  9. Key lime
  10. 6 kinds of blueberries (jewel, blueray, misty, star, sharpblue and an old one I had)
  11. A heritage red raspberry (rubus idaeus)
  12. and a thornless blackberry (rubus ulmifolius)

our little fruit trees with their various grafted limbs tagged

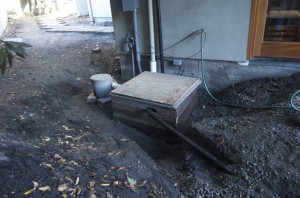
The grey water system is now up and running!  As was detailed in earlier posts, the house is double plumbed so that water from our bathroom sinks, showers and washing machine all flow out of our grey water sewer pipes for diversion into our grey water system, and the toilet sewage and kitchen sink water (aka “black water”) flows straight to the municipal sewer.  Because our grey water exited a bit low to flow directly into our intended wetlands, we needed a sump pump to pump it back up to enter the grey water wetlands… except that those also needed to be constructed before we had anywhere for the water to go, so up until now, all the water (black and grey) has ended up in the municipal sewer.

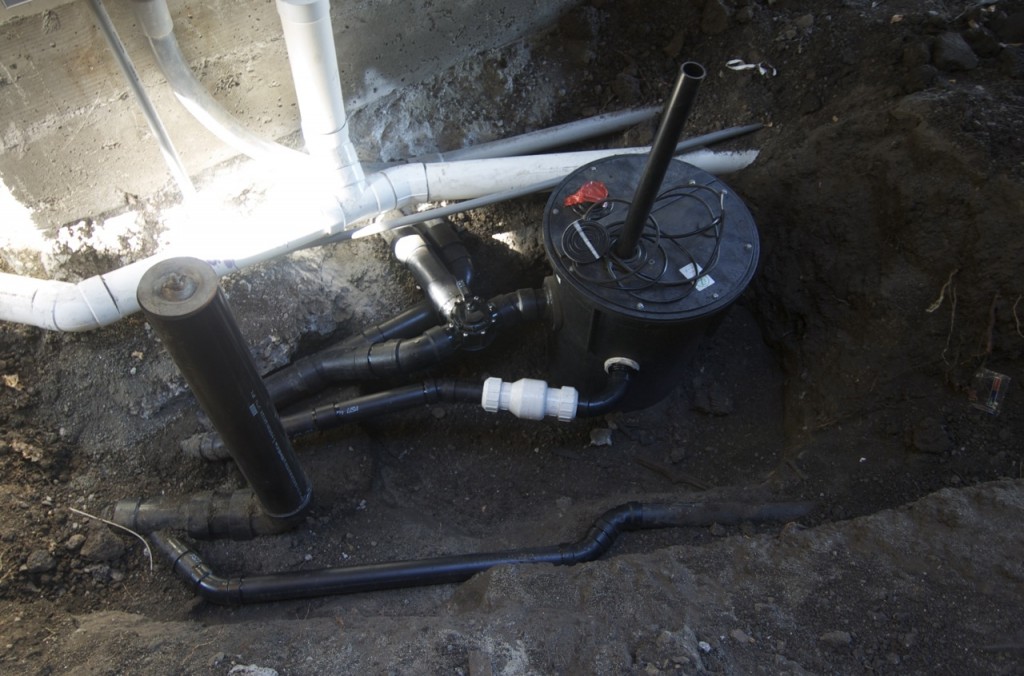
A covered box needed to be constructed around the sump pump so the area could be buried but we would still have access to the sump pump for servicing, and the diverter valve should we ever need to bypass the wetlands and start dumping the grey water back into the main sewer (note the outflow pipe leading off in the direction of the wetlands)

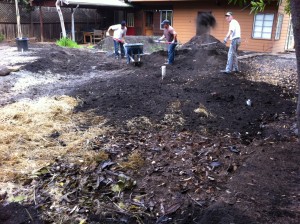
During rough grading, our guys excavated a 15’x25’x2′ deep “wetland” area in the middle yard which was to be filled with gravel for treatment of the grey water

Three trenches were then dug in the far back yard, lined with drain rock, and then perforated drain pipe. Check valves in line with the drains prevent siphoning of water back up into the wetlands. These pipes were then covered with a layer of drain rock, and reburied under the soil

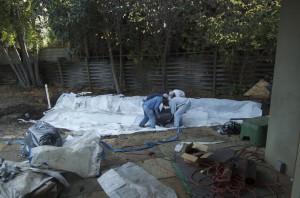
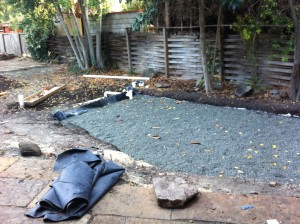
The grey water pit was then lined with a protective liner to help keep the EPDM membrane (the water proof liner) from getting punctured. You can buy special material for this commercially, but we reused the spongey plastic separators that came in between the huge paving stones. Rather than throwing it away, it found a second use as our protective liner

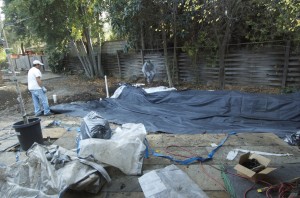
An enormous (and astonishingly heavy) pond liner was then rolled out to fill the pit. We are using 40 mil EPDM which is available at specialty pond supply stores or by mail order on-line. It is more durable than the lighter weight PVC pond liner you can buy at Home Depot or Lowes

We partly filled the liner with water to help settle the bottom and smooth it out. Then landscape fabric “socks” were wrapped around perforated pipe which was plumbed to an overflow that passed through the EPDM membrane to flow into the now buried leach field. The pipe coming in from the left with an in-line check valve is the overflow from our rainwater cachement tank, so in a year of very heavy rainfall, our excess rainwater also gets dumped into the greywater leach field

This liner was then filled with (two and a half truck loads!) of  3/8″ pea gravel, and Catherine discovered her little measurement error… the water would overflow the edge of the liner before flowing out of the pipe… the pass through, however, was a nice use of two toilet flanges that bolted face to face through the liner (with a 3″ hole cut in it) making a water tight seal … the guys at our local plumbing supply store know it is usually going to be something weird when Catherine walks in.

The pea gravel was then covered with landscape fabric and a little sand to keep it in place in anticipation of being buried… but things were on hold for yet another trip to the plumbing supply store in search of a solution for that pesky outflow issue…

A little plumbing ingenuity was all it took to bring the outflow pipe down to the right level, have an access point for draining the wetlands (should that ever be necessary), and still keep the grey water from flowing into the rainwater cachement tank…

Now when the water is filled up to the level of the top of the gravel, (but still a couple of inches below the liner top all around!) water starts to flow out of the outlet to the leach field. It is a beautiful thing. Grey water in one end of the wetlands, and cleaned water out the other end off to irrigate the yet-to-be-planted fruit trees

Then all that work is buried under a layer of mulch, and a bit of top soil with only the access drain peeking out.

We had talked about having a grey water wetlands construction party, but this construction ended up being dragged out over such a long time with such uncertain weather, that it really wasn’t practical to try to get a group together (and Catherine was stressed out and quite unpleasant to be around while sorting out the drainage issue).  Our apologies to anyone who had their heart set on shoveling gravel, gluing pipe and schlepping liner.  Should you want to do this yourself, feel free to contact us and come and see our system and see many many more detail photos.

Since “going live” about a week and a half ago, the wetlands have been handling all our grey water, and with the recent deluge, they have absorbed the rain with no problem at all, as it simply flows on out to the leach field.  For those comparing this construction to the original plans, you will notice that the “soil islands” are missing.  These are intended to increase the types of plants that can be planted with their roots down in the water to be treated.  However, we will not be putting in the stream or the ponds for a while yet, and we decided that we would put in just a few plant types initially, and see how it fared through the winter.  We wanted to make sure we didn’t have to do any significant rework of the basic wetlands before adding the other features, (and going to the effort and expense of putting in the stream).  After all, there is still so much to do elsewhere in the house!

Thanks to the guys at Garzac plumbing, the grey water system is now plumbed up and connected. Awaiting only a grey water wetlands to start discharging water into (and, of course, a family living in the house producing grey water!)

The schematic of the grey water system (Grey water schematic) shows what is going on here, but the plumbing ended up being rather complicated as the sewer line from the rear guest house (pipe at the bottom of the picture) comes into the corner, gets joined to the blackwater outlet from the house and discharged to the main sewer line (leaving the picture at the left).

You can see the grey water line exiting the house, and then there is a big diverter valve that lets you divert the water to the sump tank (to the right) or directly into the main sewer at left (if for some reason you are using something in the house you don’t want to go into the grey water system, or if you don’t have your grey water leach fields set up yet!).  The black water sewer line exits the house below the grey water line and discharges directly out to the left.

The grey water comes out of the house too low too be discharged directly into the wetlands, so it needs a BRAC sump pump designed to work with grey water to bring it up to the discharge level (this is NOT ideal – we would have avoided much of this complicated plumbing if we could simply have a gravity discharge, but we couldn’t get it to work with the slopes of the property). The tank is not a holding tank – it is a temporary surge tank.  The pump is sized to be able to keep up with the drains in the house, and discharge water up out of the pipe sticking out of the top of the tank into the wetlands as fast as it comes in.  However, if the pump breaks,  grey water needs to overflow directly into the sewer rather than backing up into the house, so the overflow line with the white check valve on it leads from the tank into the main sewer line (if the main sewer line were ever to back up, the last thing you want is sewage backing up into your grey water system which is why the check valve is there).

The big white pipe along the top is connected to the roof downspouts and leads to the rain water cachement tank in the back yard.  The grey conduit is the main power and the low voltage data lines running to the back guest house.  I wonder if we can get a few more pipes in there somewhere.

The grey water outlet showing the diverter valve, surge tank with top discharge, overflow line with check valve and all the exits to the main sewer at left

The construction of the wetlands will be another big project, and will probably be something we have another construction party for (like the bale raising), so if you missed the bale raising and would like to build some wetlands and a stream later this summer, a general call for volunteers will go out close to the time.  Drop me a line if you would like an invite.  If you were in the bale raising party… you’re already on the invite list ;-)

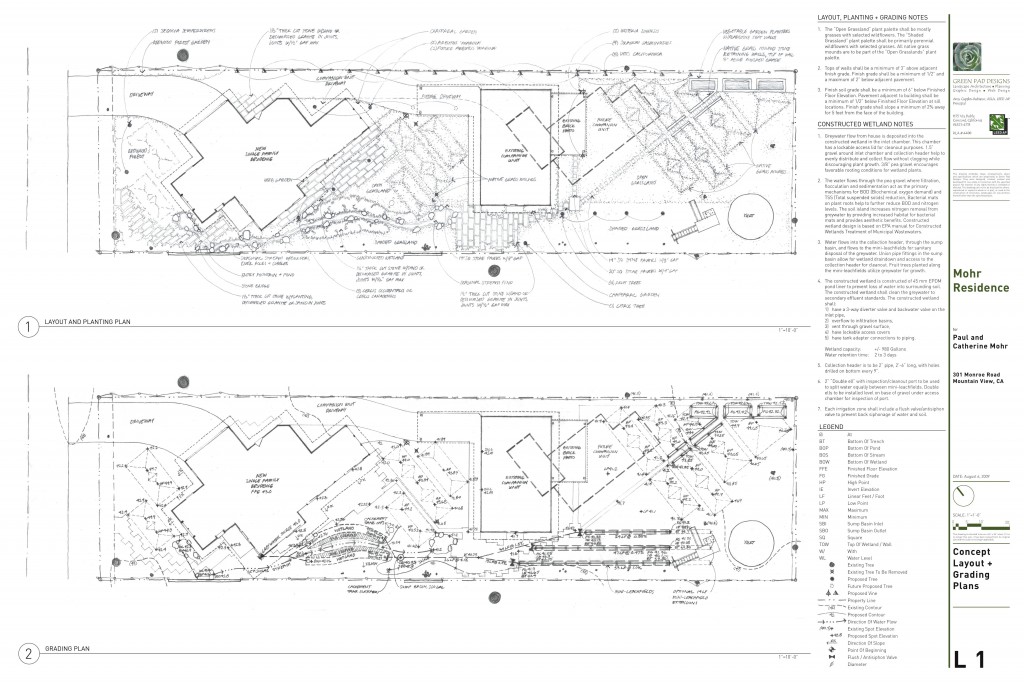
The drawing of the connection between the house greywater/blackwater sewer system and the greywater wetlands. Stamped “Approved for Construction”

The other exciting news from the week merits its own blog entry.

WE GOT OUR GREYWATER PERMIT

This is EXTREMELY exciting.  As you could have guessed from previous blog entries, (“Grey is Green” and “Landscaping Plans”), we expected that we would be putting in our greywater wetlands system long after we were done with the house because we expected the planning and permitting to take a long time.

But two things happened.  One, is that in June of this year, our Governator signed the “FInding of Emergency for Proposed Building Standards of the Department of Housing and Community Development regarding the 2007 California Plumbing Code (CPC) California Code of Regulations, Title 24, Part 5 (Graywater Standards)”.  Translated from extended legalese, it essentially said: “we’re in an extended drought, there should be no onerous regulatory red tape in the way of people putting in grey water systems, so get on with permitting them!”.  With one stroke of the pen, he changed the permitting climate entirely, and even exempted single source greywater systems from even needing permits.  This is a pretty major sea change in California.  The current emergency regs can be found here. These will be changing rapidly in the next few months as the wrinkles get ironed out.

The other happening was that Catherine went with our builder to meet with the head of the building department at Mountain View City Hall to review the proposed greywater plan prior to submission.  The plan was to walk through what we would be submitting with his department, and make sure we had all the i’s dotted and t’s crossed before submitting so that we would have as complete a package as possible, and so that we could gauge how receptive City Hall was going to be to our plans – that meeting couldn’t have gone better.

He looked at everything, was very interested in the way we had set up the greywater wetlands, reviewed all the details on Catherine’s hand-drawn “linker drawing” between the architectural house plans and the landscape plans, and predicted that we should have “no problem” getting this system permitted.  We walked out wondering “did we hear what we thought we just heard???”

Yes we did.  Two weeks after submitting the plans, they came back stamped “Approved for Construction”

As Nemo and Dory would say: “We did it! We did it! Oh yeah, yeah, yeah!”

We knew from the very beginning that we wanted to go water independent, and that we wanted to plant native California plants, and we wanted a vegetable garden, and we wanted to irrigate the fruit trees with a permitted grey water system which was filtered through a grey water wetlands, and have a stream, and somehow tie this yard in with both the old guest house we were leaving on the property and the new Zen modern architecture, and and and…  See blog posts “Planning for water independence”, “Fresh canvas”, “Grey is green” and “Rainwater cachement”.  Oh yeah, and have a beautiful yard that was inviting for guests to wander in, children to play in, had cool shady spots for those relaxed summer weekend lunches (for those future relaxed summer weekend lunches that one can have when you aren’t building a house!).

But where to start?  Many decisions were going to be driven by the details of the grey water system, and grey water systems that people put in are often pretty bad eyesores… big external piping and storage tanks full of pea gravel.  We wanted the water management to be a beautiful feature of the yard.   We had some sketches and ideas, and had been reading the bewildering California Plumbing Code on grey water systems, but we knew we’d need help.  Catherine was getting very worried that she wouldn’t be able to figure out how to get all the i’s dotted and the t’s crossed to make a permittable grey water system, and while we both had lots of ideas for the yard, no cohesive aesthetic was emerging that we felt would do justice to the house.

Extremely luckily for us, an old childhood friend of Catherine’s, Amy Cupples-Rubiano, is a LEED certified landscape architect extraordinaire with a lot of experience in California native landscaping from huge commercial projects that she had been working on.  We discussed her taking on this “little project” (the scale of our residential project is tiny compared to what she has been doing!), and she offered to do it through her consulting company Green Pad Designs.

We sat down together at the site and talked about all the things we wanted, and from her first sketch, we knew she would push us in some new directions and manage somehow to build all these desires into a cohesive whole – and we just got the final concept and are thrilled.  

Rainwater cachement tank

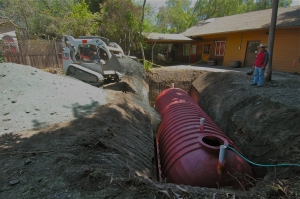
This week we put in a 9000 gallon rainwater cachement tank. It is quite a business putting in a tank this big. First, a huge hole must be dug, then the tank is brought in (random people on the street asked if it was a submarine…), a huge crane lowers the tank into the hole, and it gets back-filled with pea gravel before you bury it again under some of the dirt that you just excavated just so you can have a big fiberglass lined hole in the ground. Why on earth bother with all of this? In a word: irrigation.

Although you can’t drink it (yet), rainwater collected off the roof can be used for watering the yard and in arid climates, watering lawns and yard plants is more than half of the water consumption in an average household. In the United States, the domestic water consumption is 572L (about 150 gallons) per person per day. Those of us living in a climate where it only rains part of the year — the numbers tend to be higher than average. An efficient house with lower water use appliances can get water use down inside the house, but unless the water monster in the yard is tamed, installing low flush toilets is making just a small dent.

With a 1/3 acre lot, we were looking at a relatively large chunk of land, the needs of which could easily overwhelm any efficiencies we managed in the house. If we left the 3000 sq ft of lawn that had been there, and we watered according to the standard recommendations (1.5 – 2 inches per week in the hottest months, 1 inch per week in spring/fall), over the course of the dry months, we’d apply about 57 inches of water spread out over 9 months to the lawn (keep in mind, we get 15 inches of rainfall in a good year around here). Add that up over the area, and we’d be looking at over 100K gallons of potable domestic water irrigation spread on the grass alone just to keep it green, in other words, 280 gallons a day on average on that lawn – almost 100 gallons a day for each person in our 3 person household.

The solution for us was no lawn. We read up on California native plantings and figured that with a native garden (and our grey water system when in place), we can cut our water usage for the landscaping dramatically. So dramatically, that we thought we might be able to go municipal water independent for our plants… which brings us back to the tank.

That 15 inches of annual precipitation comes in just a few months, but if we catch all the water that comes off 1500 sq ft of roof, that is 1875 cu ft of water, or 14K gallons a year. Since we have a 9K gallon tank, even in a 70% rainfall year like we’ve been having for the last few years, it will still fill the tank. And 9K gallons is enough to keep our non-native fruit trees, our vegetable garden, and our little pond and stream environment watered (we hope!). In years with hot fall months, or late rains, we’ll probably be using municipal water by October or November — but maybe not.

Does it make sense financially? Um… no. At today’s ridiculously low, heavily subsidized water rates, the rainwater we store in that tank isn’t going to save us much money. There are simply no meaningful financial incentives in place to encourage any kind of conservation. You can’t even make back the cost of a low flow toilet in the lifetime of a house. But we decided to do it anyway. California is rapidly running out of water, and the fee structures will have to change if there is ever to be any real conservations solution. In Australia, rainwater cachement is mandated for all new construction, and at some point California will have to grapple with how to solve this problem. If rates go up dramatically, well, then it will look like a good financial investment, but we’re not holding our breath.

Some interesting numbers from a World Bank 2005 report on fresh water:

The US consumption of water for domestic uses is 572L (150 gallons) per day per person.

Our industrial and agricultural use completely dwarf those numbers at 1,980 L/person/day and 1,643 L/person/day respectively (totaling 4,195 L/person/day!)

We have a sustainable 2,350L/person/day available in the US, so 1,850L/person/day of our use is considered unsustainable, or “excess” use.  What is going to happen as we enter a period of unpredictable climate change, and our population keeps growing?

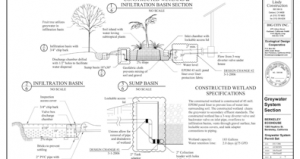
Graywater plan

The PERMITTED grey water system from the Ecohouse in Berkeley! Check them out at www.ecologycenter.org

One of the great ironies of building in chronically water short California is that “grey water” (water from sinks and showers and washing machines) and “black water” (water from toilets) are both dumped into the sewers because you are not allowed to do anything else with your grey water.  Never mind that it could be reclaimed for irrigation, or re-used as water in your toilet tank so that you aren’t filling your toilet with what was potable water before you dumped it in the bowl…  in theory, grey water could be re-used, but the code requirements for permitting are so difficult, that for all intents and purposes, grey water systems can’t be built.  There are all kinds of groups like grey water guerrillas who are flying under the radar, but nothing “legit” until the group at the Ecology Center in Berkeley actually designed and built a permitted residential greywater system in 2007 – with that precedent, we are also going to try.

We will be plumbing our house with parallel sewer systems, and bringing our greywater to the edge of the house near the future stream.  Until we get the permit, the greywater goes into the regular sewer like any normal plumbing, but the plan is to build the leach field underneath the stream bed, and have it terminate in a constructed grey water wetlands at the bottom of the stream, and once we have the permit (and we’ve built the leach field), we turn the diverter valve and start watering the wetlands.  We expect that the permitting process will be long, so we are pursuing it separately from the house building, because the wetlands can be built long after the house is done if we have to.

Rolling Sod

Paul and his dad cut the sod and rolled it up.

The back yard behind the guest house (as opposed to the Middle yard) was a large expanse of water greedy grass which we didn’t want to keep at all.  Bill (Mohr, father of Paul) and Paul cut and rolled up the sod, and we found someone who wanted it on Craigslist!  The sod is now the happy play field of some Los Altos toddlers, and our plan is to turn this area into a California native meadow that requires only minimal watering.

Meadow flowers

Meadow flowers

As part of the house build, we will be installing a 9000 gal rainwater cachement tank which will catch the water from our roof, and our plan is to use it to water the yard, and keep all the landscaping municipal water independent.  We have several fruit trees on the property (figs, plums and loquats), and a few almond trees, and we will be bringing our blueberry bushes and dwarf citrus.  The trees plus a vegetable garden will need some water year round, but the meadow grasses are all adapted to dry climates and go dormant in the summer after being a riot of wildflowers in the spring.  Since we will have lots of dirt left over from the excavation for our rainwater cachement tank, we were planning to put in a few undulations in the otherwise rather flat back yard…  of course we’re keeping the yurt and the play structure!